Git and GitHub: Must know guide
Getting started with Git and GitHub from Beginner to Advanced

I am a developer from India and am a full stack web developer that loves tinkering with artificial intelligence and machine learning, am also an opensource enthusiast that has recently gotten into cloud native technologies and devops.
Recently, I was having a friendly discussion with some other developers about which technology they feel has helped them the most in their careers and their work till now.
We discussed various technologies ranging from React to Python to Kubernetes and whatnot, but one common piece of tech that all of us could agree upon was Git!
Git is one of the best things you could invest in learning as a developer, though many developers feel that they do know Git and use it daily, they're still not completely aware of all its helpful nuances and features.
So for all the newcomers wanting to start their journey as a developer as well as the ones that already have initiated their journey but would still like to extend their knowledge regarding Git, let's get started!
Though it's not necessary for Git, I'd recommend you use VSCode to follow along with the tutorial because it has excellent inbuilt support for Git and VCS in general.
Git?
Git is a free open-source version control system that is the most largely used by almost all developers across the world.
It is one of the most if not the most important tools that developers use across the world for maintaining and managing their projects as well as for larger projects that have a lot of people working on them.
Version Control System?
Now you know that Git is a Version Control System or VCS for short, but what is a VCS? What is it supposed to do or accomplish? Why is it important?
So, a VCS is simply a tool or software that allows you to systematically and conveniently track changes in a project and its code base.
It helps provide features such as knowing exactly which person made what change to which file on which line, what the change was, and when the change was made as well as most importantly allowing you to go back to a previous state or change as and when you need to.
It eliminates the need for managing different versions of the project as different projects or folders entirely. No need to label project folders as "v1" or "v2" anymore. All the changes between v1 and v2 would automatically be tracked by the VCS on a per-change basis and you can select which changes you want to keep or which version you want to switch to without keeping multiple copies of the same project.
Moreover, you no longer need to be worried about always having a copy of the codebase that is working in case something breaks and you're not able to restore the code to its original state. VCS solves this by allowing the code to be reverted to any of its prior states whenever the need arises.
Also helps a lot in collaborating with others as it keeps a track of changes by each individual independently.
GitHub?
GitHub is pretty much just a code storage and hosting platform that supports collaboration between multiple developers and supports Git as a VCS.
You can think of it as a place on the cloud where you can store your code, work on it, share it and manage it as well.
Getting Practical?
Now that we have the basic theory and concepts understood, it's time to move on to the really important stuff, which is the hands-on part of working with Git and GitHub.
To do so we start from scratch and I've assumed that this is the first time you would be working with Git or GitHub as well hence we would be covering everything from the basics.
Setting up Git
The first step to getting started with Git would be to get it installed on your system first.
You can simply go on here and download Git for your operating system and run the installer to get it set up.
To ensure that you have Git installed and setup correctly run the following command in your cmd/powershell/terminal:
git --version
This should give you an output that shows your version details for Git.

Great! You have Git setup successfully now!
Installing Git on Windows specifically will also provide you with "Git Bash" which is a Unix/Linux like shell that you can run Git on, things like "GitHub Desktop" and other VSCode extensions also exist if you want a Graphical User Interface (GUI) i.e. a desktop application with a visual tool instead of running it on cmd/terminal.
I'll be following cmd/terminal in this blog though as it's my preferred method.
Setting up GitHub
Now that we have Git ready to use, we will be creating a sample project for testing out various Git commands, and for that, we would be storing the project on GitHub.
To get started with this, simply go to their official website here and register/signup for a new account similar to how you would create a new account on any other platform or site.
Once logged in, navigate to your profile page and go to the "repositories" tab.
Repository?
So now would be an appropriate time to talk about repositories.
A "repository" is simply a name given to a project folder that is being managed using a VCS like Git.
On code storage platforms such as GitHub, you need to set up a folder where all the codebase of your project would be stored, this is called a repository. You can connect your project on your local machine to a repository using Git. Multiple such projects and repositories can be set up as per your need and requirements.
Every project would reside in its repository respectively.
Personal Access Token?
When you will try to access your GitHub account via your Git, your Git will require you to authenticate yourself to verify that it's you who is trying to make the changes to the repository. Git will require your username and password to do this, the catch is that actually Git doesn't take your actual GitHub account password for this, instead, you are required to set up a Personal Access Token (PAT) for this and each PAT can have different rights depending on its usage.
You can create a new PAT by going to the settings on your GitHub account and scrolling down and selecting "developer settings", then selecting "Personal Access Tokens" and then "classic".

Then select "Generate new token" and then "classic". This will take you to the PAT creation page where you can describe the rights of this PAT.
You can name the token whatever you want under the "Note" section, set the expiration date of the token next i.e. after what period the PAT will become unusable at which point you'll have to create a new PAT, then select all rights the PAT will possess from the list provided, since we're using it for simple auth, just ensure that the "repo" scope is selected and just generate the token.
The token will then be shown to you which you must copy and save in a secure place, note that this is the only time you'll be able to see and copy the token, in case you close the window and later forget the PAT then you'll have to delete this one and create a new one, there is no way to recover a lost PAT.
Creating a Repository
Now let's get started with creating our first repository on GitHub!
Since you're already on the "repositories" tab on GitHub after the last step, click on the green-coloured "New" button on the page.
This will take you to the repository creation page which allows you to set up a new repository on your GitHub account, here you can select various methods and options to bootstrap your projects such as importing other repositories, using templates, creating default files like .gitignore and README.md and much more.
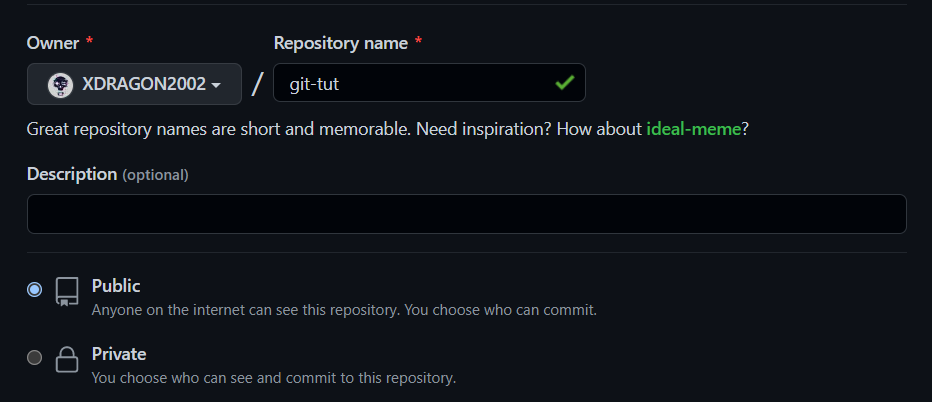
We will not be delving into a lot of the fancy stuff but instead will be creating a repository from scratch, for which, you just need to enter a name for this new repository that hasn't been used for any other repository on your account, two repositories with the same name can exist on two different accounts but not on the same one. So pick a name, I'll go with "git-tut".
Now you can select if the repository would be public or private, the major difference between the two is the simple fact that if you make the repo public then anyone who visits your GitHub profile would be able to look at the repo, private repositories, on the other hand, are only visible on your account instead. Again, I'll go with public visibility this time.
Don't worry too much about these settings, all these settings including the name of the repository as well as its visibility as public or private can be changed whenever you want.
Just scroll to the bottom and click on "Create Repository".
Congratulations! You've created your first GitHub repository!
Git init
Now that we have a repository setup on GitHub, first, we need to initialize git to track changes for our project locally on our system from where we will send the code to our GitHub repository.
To do this we first need to create a local project, so let's do that. I'll name the project "git-tut" on my local too, do note that it's not necessary to name your local project and your GitHub repository after the same name, they can be completely different if you want them to be.
Now open up the project folder in your code editor for easy access to both the folder as well as the terminal, I'll be using VSCode for this which I recommend others to use as well if they currently don't, it's again not at all necessary.
Now in the terminal simply run:
git init
This will create an empty Git repository/project in that folder and Git will now start tracking any changes you make in that folder.

Git has created a hidden folder named ".git" in that repository which is how Git tracks its changes and updates. You can go and take a look at this by opening the folder in your file explorer and enabling the option to show hidden files and folders.
On Linux you can run:
ls -al
This will list out all files and folders both hidden and visible, this will show you something like this:

You can see that the .git folder is indeed present.
Git remote
Now it's time for us to link our local Git repository to the one we created on GitHub.
First of all as a proof of concept, run the following in your terminal in the same folder:
git remote -v
This command is used to list all links and connections between the local repository and any other ones, when you run this you will not get any output simply because no connections yet exist. So, let's create one.
Go to your repository on GitHub and copy the URL of the repository, or even better just click on the copy button present in front of the URL.

This is the same as the URL on the browser followed by a ".git" extension.
Once copied, let's go back to the terminal on our local project and run the command (Make sure to replace <github-repo-url.git> with your project URL from GitHub):
git remote add origin <github-repo-url.git>

What this command does is that it tells Git on your local project to link the local repository to the URL of the remote repository provided and to refer to this GitHub repository by the variable name "origin". You can use any other name as well but the origin is a global convention for this.
Now once again run:
git remote -v
This will now give you output similar to:

This is confirmation that now our local Git repository can send and receive changes from the GitHub repository. Do note that you can link various GitHub or other repositories to the same local repository as well, simply name them with some other name such as "origin1", "origintest", "origindev" etc.
Git status
Try running the following:
git status
This command gives you the current tracking status of all the files which include changes, this will include additions, modifications and deletions.
It will give an output similar to:

Forget about most of the things mentioned here for the time being, focus on the last line that's within brackets. Git doesn't have any files or changes to track in the project, so let's create something.
I'll create a simple file.txt in the folder with the following content:
This is sentence number 1
Now run this again:
git status
This time around you will see something of the sort:

It shows that "file.txt" is now present in the folder but is not being tracked. This means that though Git now sees this newly created file it doesn't track any changes to it.
Git add
To make Git update the changes and keep a track of the new changes, we will first have to add all the changes that we want Git to track to the tracking list, this process is called "staging" your changes.
git add file.txt
This will add file.txt to the staging area and update its status, to verify this once again run:
git status

Now Git can track the changes made to the project, hence can detect the changes to file.txt stating it as a "new file".
You can also use:
git add .
This will add all the changes and updates to files in the project at once instead of having to do it on a file-by-file basis in the earlier-mentioned approach.
Git rm
You can remove changes from the file.txt staged state by using the command:
git rm --cached file.txt
This will remove the file from the staging area back to its untracked state which can be verified by running and checking its status again.
Now that you know how to unstage any unwanted changes you need to stage the changes to file.txt again.
Git config
Now, this would be a good point to talk about git config and set it up. Git config is a configuration file that simply stores some information related to your Git such as your username, email and some other settings.
To "commit" changes, Git requires both the username as well as the email to figure out exactly who made the corresponding change in the codebase.
To set these you can run the following commands:
git config --global user.email "<your email>"
git config --global user.name "<your name>"
This will configure Git to use <your email> and <your name> to use as your email and name respectively across all your Git repositories throughout your system.
You only need to do this once whenever you reinstall Git on your system after which you only need to do this when you want to change these values.
To change these values for each Git repository separately simply run the same command and remove the --global flag:
git config user.email "<your email>"
git config user.name "<your name>"
Also since we would be sending our changes to our GitHub repository as well we'll be required to enter our GitHub credentials, Git will ask us to enter these credentials everytime that we try to make such changes so it gets tedious everytime that you need to enter these details.
So we'll tell git to store these credentials for future use after we enter them the first time, so we'll only ever have to enter these credentials once after which Git will use them automatically from then onwards.
To do this, execute:
git config credential.helper store

This will tell Git to store the credentials once we enter them later on in the guide.
Git commit
Now we will make Git save the changes that we have made in the project, this is known as a "commit". To commit your code we use the following command:
git commit -m "<commit message>"
Here <commit message> is a simple one-liner message that is saved along with your commit and helps describe what the purpose of the commit was. You can set it to whatever you want.

Now you have committed your changes to Git. In case you have not set up your git config yet, git commit will throw an error and ask you to set your config first.
Now if we run:
git status

As we have committed our current changes we no longer have any uncommitted changes so our status is depicted as clean.
Git log
Git stores logs of all the commits made in the project, to access them simply run:
git log

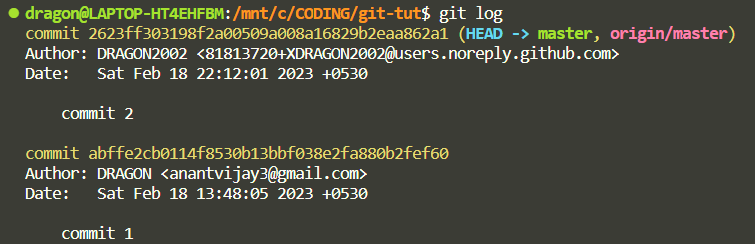
Since we've only made a single commit so far, the logs depict just that, that too with the commit hash, the author that we defined in our git config as well as when the commit was made along with the commit message.
Git push
Now that we have made a commit, let's try and push it to GitHub, "pushing" means nothing but just sending your changes from your local Git repository to your remote GitHub repository.
You can do it by simply doing:
git push <upstream url> <branch>
Here <upstream url> refers to any of the remote repositories that we have linked to our local repository which in our case is just one, i.e. "origin". Moreover, <branch> refers to which branch on the remote repository to push to, we'll discuss what a branch is later, for now just know that your branch would be either "main" or "master" as the default branch is one of these when you create a new repository.
Also, note that you can drop the <upstream url> and <branch> which will then make Git push changes to a set default instead.
So run:
git push origin main
If it fails run:
git push origin master

When doing this for the first time since your credentials are currently not stored in the credentials store, Git will ask you to enter your username and your password, for your username just enter your GitHub username and for your password enter your PAT that you had created earlier.
Now visit your repository on GitHub.

Congratulations! You've learned how to push your committed changes to GitHub!
Git pull
Now that we know how to make changes to a remote repository, it's also important to know how to get changes from your remote repository to your local repository.
To do this, let's first make some changes in file.txt on GitHub.
Just click on the file and select the edit option.

We'll change the line to:
This is sentence number 2
Scroll down to the bottom and give a commit message or you can leave it blank and GitHub will give a default commit message and make the commit, I'll name mine "commit 2".
Now since our remote repository has changes that we don't have on our local simply go to your terminal and run the command:
git pull <upstream url> <branch>
Which is similar to the git push command.
Also, note that you can drop the <upstream url> and <branch> which will then make Git pull changes from a set default instead.
Since I now know that my branch name is "master", I'll run:
git pull origin master

Now if you open "file.txt" in your locally you'll see that the changes from your remote repository have been applied.
Also if you check the logs again using:
git log
You'll see that a new commit has been added to the log which is the same one that we made from GitHub.
Git pull is an internal combination of two separate Git commands, namely "fetch" and "merge".
Git fetch
Now let's again make changes in the remote repository, change the file line to:
This is sentence number 3
Now we'll "fetch" these changes to our local, which simply means that we'll get these changes to our local but won't apply them to our local, Git will just store these changes on your local without hindering or updating your current code.
Simply run:
git fetch <repository-url> <branch>
You can remove the <branch> if you want to fetch changes for all branches, moreover, you can remove <repository-url> if you want to fetch changes from all remote linked repositories.
Since we only have one branch I'll get changes for all branches from the origin, since I only have one remote I could have removed that as well, just out of preference in this case I'll run:
git fetch origin
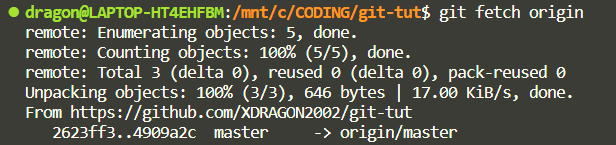
What this has done is that it has fetched the changes to a new branch in your local repository. To view this run:
git branch -a

The "-a" is required because it tells Git to list all the branches not just the ones created by you.
Git merge
Now that we have fetched these changes from remote let's merge them to our current master branch.
To do this simply run:
git merge origin/master

Now if you check file.txt it will reflect the required changes.
Git branch
Since we had used the git branch command earlier to list all branches, let's talk about what exactly is a branch.
A branch is simply put just an exact copy of your project to which you can make changes, i.e. you can have different branches that you implement different features in hence allowing you and your team to work on many different sets of changes parallelly which can later be combined in a single codebase on a single branch which is in most cases referred to as the main or master branch.
To list all the branches on your local run:
git branch

Since master is the only local branch we have right now that's all that it lists.
Git branch is very closely related to git checkout so we'll see how these two work together in a real environment.
Git checkout
Let's create a new branch on our local, simply do:
git checkout -b <new branch name>
I'll name my branch "branch_1" so:
git checkout -b branch_1

This will create a new branch with the name "branch_1" and will also switch your current branch to this newly created branch.
Run:
git branch

This shows that I indeed am on a new branch, the "*" tells you which branch you are on currently.
Let's now make a change to file.txt and change the line to:
This is sentence number 4
Now let's switch back to the original master branch using:
git checkout <branch>
In our case it would be:
git checkout master

Since we had not committed our changes Git has brought over those changes from the other branch. So go to the other branch and commit your changes.
git checkout branch_1
git add .
git commit -m "commit 4"
git log

If you check the logs on that branch you'll find the newly made commit.
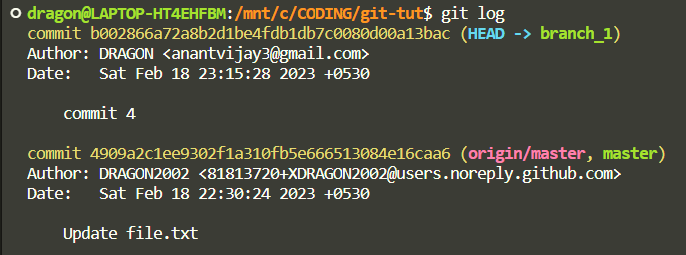
Now checkout to the master branch and check the logs again.
git checkout master
git log

You can see that our latest commit doesn't exist on this branch, moreover, if you check the file on this branch you'll find that the changes we made on the other branch do not get reflected here.
Now let's push this new branch to GitHub.
git checkout branch_1
git push origin branch_1

On your GitHub you would be able to see something like:

You can use the drop-down menu which says "master" to navigate to your newly pushed branch i.e. branch_1 or via the branch list by clicking on view all branches and you can see that the changes you had made are reflected in the new branch.
Pull Request
Let's now take a moment and discuss what a Pull Request more commonly referred to as a "PR" actually is.
A PR is just a request sent from a codebase to another codebase which is most of the time another remote repository or branch or both of the same original codebase, this request asks the admin or owner of the other repository or branch to "pull" changes from the codebase that you have opened the PR from and update their codebase to the state that your codebase is in.
Let's open a PR from our branch_1 branch to the master branch.
You can either click on the "Compare & pull request" button in the yellow box pop up or you can switch to the branch you want to open the PR from on GitHub and click on "Contribute" and "Open pull request".

GitHub will take you to the open a PR page where it will ask you to enter the title of the PR as well as add a description for the PR.
More importantly, it will also show you exactly from which branch to which branch you are opening a PR to as well as if you scroll down it will also show you the changes that will be made if the PR is accepted.


Just click on "Create pull request" and open the PR.

You can navigate to the PR section on your repository where you can find your newly created PR listed, The PR includes many options such as adding reviews by others, discussing changes with others, checking what code is going to be updated, and all commits included in the PR, further options to edit the PR as well as an option to merge the PR by the admin or owner of the repository.
Merging simply means accepting the changes in the PR and applying them to the branch it was requested for.
So just click on "Merge pull request" on the PR and merge the PR to the master branch.
On your master branch on GitHub, you can now see that the changes from your other branch have been applied to this branch via the PR that was merged.

If you view the commit history or log of the master branch you can also see that a new commit was added which included changes from the PR.
Git stash
Now since our remote repository has the updated master branch, let's try to update our local master branch but before that let's make some changes to the file on our local repository on the master branch.
git checkout master
Change the line in the file to:
This is sentence number 5
Now let's try to pull the changes from our remote master branch using:
git pull origin master
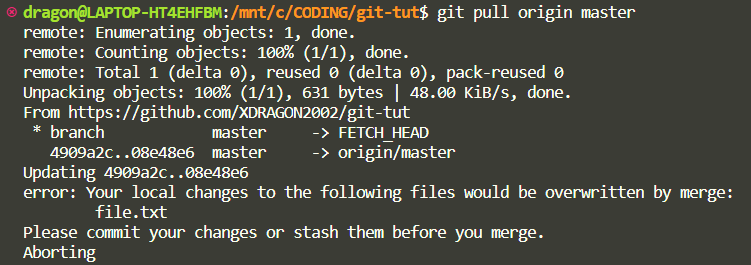
This will lead to an error because if we apply those changes remotely then all the changes that we have hence applied from then onwards will be lost.
Now to resolve this we will use stashing since we have not yet committed our changes. Simply run:
git stash

What "stashing" does is that it simply makes a copy of the changes that have been made after the previous commit which is saved in the stash and can later be reapplied to any branch. This is the same as copy-pasting the changes made in another file which after pulling changes from the remote can then be reapplied or repasted.
Now that we have stashed our changes pull changes from the remote using:
git pull origin master
git log

Upon checking the logs and inspecting the file you can verify that the changes from your remote repository have been successfully applied.
We are now ready to reapply changes from our stash to the codebase now.
You can run:
git stash apply
This will apply the changes stored in the stash to the code and also retain the changes in the stored so it can be applied again if need be.
Alternatively, you can use:
git stash pop
This will apply the changes to the code but will remove the changes from the stash hence you cannot reapply the changes if you need to.

This throws an error because there is a conflict in merging the newly updated code and the stashed changes.
Merge Conflict
So what even is a merger conflict? What happened is that initially, our file had sentence number 3, after which we created a separate branch that updated the sentence number to 4 which later got updated in the remote master via the PR. Then we changed the number from 3 to 5 on our local master and stashed those changes so that we could pull changes from the remote so now that we try to reapply the changes from the stash, Git gets confused as to which change should be kept as two changes exist to the original codebase now, one from the PR that updated line number from 3 to 4 and another from local which updated it from 3 to 5.
Instead of stashing if we had followed the approach of committing our changes instead and then pulling, that too would have led to a merge conflict. In situations like these, there is no way to escape a merge conflict so let's learn how to resolve them.
In your VSCode editor, you'll see an option to open a merge editor where you'll be given an interface to select exactly which change you wish to keep for each conflicted piece of code in each of your conflicted files.

Just select whichever change you wish to accept and click on complete merge. I'll accept the incoming change from git stash pop.
Check the logs using:
git log

As you can see our changes from the remote master have been applied and it also tells us that a merge was performed.
Moreover, our changes from our stash have also been applied on top of the previous commit that we pulled from the remote master. So we can continue working on the changes that we were working on before we had to stash them.
Git rebase
Let's first commit and push the changes we had applied from the stash.
git add .
git commit -m "commit 6"
git push origin master

Now let's create a new branch from master and make two commits in that branch updating the sentence number in the file to 6 and then 7.
git checkout -b branch_2

Update the file to:
This is sentence number 6
Commit the change.
git add .
git commit -m "commit branch_2 1"
Update the file again:
This is sentence number 7
Make another commit.
git add .
git commit -m "commit branch_2 2"
Now you have made two commits in your new branch that do not exist on your master branch.
git log --oneline
This can be used to show the commit logs in just a single line.

Now make another commit in the master branch.
git checkout master
Update the file to:
This is sentence number 8
Make the commit.
git add .
git commit -m "commit 8"

Now, what if we want to apply these commits to the master branch as if they were made on the master branch instead of branch branch_2 keeping in mind that both branches have diverged? This is where rebasing comes into play, it allows us to manipulate the commits in such a way that it looks like the commits were originally made from a different branch or a different base.
This is mainly done to maintain a clean commit tree so that changes and updates can be tracked more efficiently by the team.
There are two types of rebates namely standard and interactive.
Standard Rebase
To rebase commits from one branch to another we simply go to the branch where we want the commits and run:
git rebase <base>
Here <base> can be the name of the branch or any other reference to a commit.
In our case since we simply want to rebase commits from master to branch_2 we execute the following from branch branch_2:
git rebase master
This will again throw a merge conflict as the changes have been made to the same place in both changes.

Simply accept the incoming changes from branch_2 and add the file to the staging area and tell git to continue rebasing as the merge conflict has now been resolved.
git add .
git rebase --continue

Now if you check the log on the master branch you'll see that the rebase has been completed and the merge conflict has been resolved as well.
Interactive Rebase
Now let's try an interactive rebase which is much more powerful.
Update the branch_1 branch to remote master and make another commit in that branch.
git checkout branch_1
git pull origin master

This time let's make a change that will not cause a merge conflict so create another file "file2.txt" and write in the line:
This is sentence number 1 of file 2
Commit the change.
git add .
git commit -m "add file2.txt"

Now go back to branch branch_2 and initiate an interactive rebase.
By simply doing:
git rebase -i <base>
In our case:
git checkout branch_2
git rebase -i branch_1
Doing this will open up an editor in your terminal like:

Here we can select exactly what changes we want to be applied, if we put "pick" in front of any commits then those will be applied to the other branch, if we put "drop" instead then those commits will not be applied we can also do many other things to the commit history here, but an extremely useful use would be to squash the commits.
Squashing combines multiple commits into one commit by combining every commit with its previous commit hence making the commit tree cleaner. In this rebase I will squash the second and third commits into the first one by writing "squash" in front of the last two commits and "pick" in front of the first one.
Simply save (Ctrl + S) and exit (Ctrl + X) from the nano editor after which you would be asked to give a commit message if you skip this as I did then the message would default to the commit message of the squashed commits.

Git revert
We now look into reverting our commits, what reverting does is that it takes in a commit and reverses the changes made in that commit, it does this by applying a new commit that contains changes exactly opposite of the passed-in commit, this helps maintain the commit history all the while reversing changes.
You can do this by simply:
git revert <ref>
Here <ref> is simply a means to reference a commit this can be something like HEAD or a commit hash.
Let's try to revert the HEAD of branch_2.
git checkout branch_2
git revert HEAD
This will then ask you for a name for the new commit to being made because of the revert.
If you then check the logs:
git log

You can see that the commit has been reverted and a new commit has been added, you can verify this by checking "file.txt" as well.
Git reset
Now we talk about moving the HEAD of our commit tree to a previous commit making it so that no commits had taken place after that commit hence effectively taking the project back to a previously desired state.
There are three types of resets possible, namely, soft, mixed and hard.
Soft Reset
Let's perform a soft reset to go back to the first commit we ever made in the project, i.e. "commit 1" on branch branch_2.
You need to run:
git reset --soft <commit hash>
In our case we do:
git checkout branch_2
git reset --soft abffe2cb0114f8530b13bbf038e2fa880b2fef60
git log
git status

What --soft does is that it updates the HEAD back to the specified commit and removes all commits between the new HEAD and the old HEAD and stages all the changes made between the previous HEAD and the new one in case you might want to commit those changes again as a single new commit.
Mixed Reset
Let's perform a mixed reset to go back to the first commit we ever made in the project, i.e. "commit 1" on branch branch_1.
You need to run:
git reset --mixed <commit hash>
In our case we do:
git checkout branch_1
git reset --mixed abffe2cb0114f8530b13bbf038e2fa880b2fef60
git log
git status

What --mixed does is that it updates the HEAD back to the specified commit and removes all commits in between the new HEAD and the old HEAD and unstaged all the changes made between the previous HEAD and the new one in case you might want to stage-specific files and commit those changes again as a single new commit.
Hard Reset
Let's perform a hard reset to go back to the first commit we ever made in the project, i.e. "commit 1" on the branch master.
You need to run:
git reset --hard <commit hash>
In our case we do:
git checkout master
git reset --hard abffe2cb0114f8530b13bbf038e2fa880b2fef60
git log
git status

What --hard does is that it updates the HEAD back to the specified commit and removes all commits in between the new HEAD and the old HEAD and deletes all the changes made between the previous HEAD and the new one.
Ending Thoughts?
I've tried my best to cover all the major and most used git commands and have also gone over GitHub a fair bit too. Still, there is a lot regarding git that is yet to be learned, I might make a future blog regarding it but for the time being, I'd suggest you get familiar with the commands and concepts covered above in the blog and use the most important Git command there is:
git --help
Cya in the next blog!


